Convert Depth:
Use the Convert Depth option to change the color depth of the image. Click and hold for a second on the Convert Depth icon to display the Convert Depth popup menu.
Change DPI:
Use the Change DPI option to change the resolution of the image. Click and hold for a second on the Change DPI icon to display the Change DPI popup menu.
Scale Image:
Use the Scale Image option to scale the image. Click and hold for a second on the Scale Image icon to display the Scale Image popup menu.
Rotate Left/Rotate Right:
Use the Rotate Left/Rotate Right options to rotate the image.
Flip Horizontal/Flip Vertical:
Use the Flip Horizontal/Flip Vertical options to flip the image.
Invert:
Use the Invert option to invert the image.
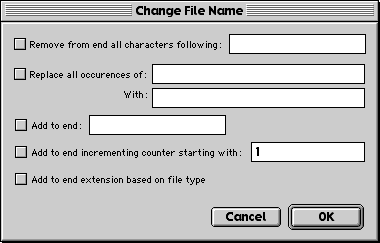
Change Filename:
Click and hold for a second on the Change Filename icon to display the Change File Name window. Use the options in the Change File Name to define how to change the file's filename.
The Change Filename Options:
- Remove from end all characters following - strips all the characters from a file name starting with the
- Replace all occurrences - replaces all matches entered here with the replacement string entered in the With field.
- Add to end - appends the following characters to the file name.
- Add to end incrementing counter starting with - appends the following count number to the end of a filename.
- Add to end extension based on file type - add the default extension for the file type to the end of the file name.
Previews & Icons:
Click and hold for a second on the Previews & Icons icon to display the Previews & Icons window. Use the following options:
- Create Previews
- Preview Size
- Preview Compression
- Options - specify color depth of preview
- Create Custom Icons
- Icon Type
- Create
to change how previews and icons are set for the modified file.
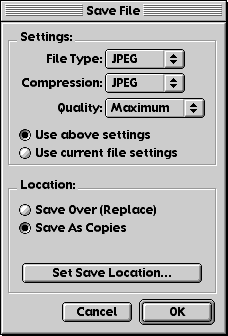
File Save:
Click and hold for a second on the File Save icon to display the Save File window. Use the following options:
- Settings - change the file type, compression, quality of the new image file or leave them exactly the same
- Location - use to define where the new files are created, either the same folder (Save Over) or at another location specified using the Set Save Location.
to define how the newly saved file should be saved.